Happy Sunny June Friday Everyone!
I have been receiving many questions about the process of creating documents on the UGCloud. As a result, I thought I would write up a quick set of step-by-step instructions on how to create a basic document on the cloud. If you are interested in the other types of documents listed (presentations, forms, spreadsheets, etc.) please feel free to email me and I will gladly create a similar 'how to' file. Enjoy!
Log on to UGCloud
- Open Google Chrome web browser
- Type www.ugcloud.ca into the address bar
- Enter your user id and password (same as you use to log onto the computer - for students first 2 letters of the first name, first 3 letters of the last name and last four digits of their OEN - for teachers first initial and last name - don’t forget to change the domain to ‘staff’ if logging in as a teacher)
- You will land on the UGCloud Inbox page by default
- Click on Drive in the black toolbar to access the document creator.

Choose the type of document
- On the left hand side click on ‘Create’ and a list of possible types of documents will appear under the red ‘create’ box.
- These are the following options available:
 Google Documents
his is a simple and straightforward word processing program which will allow the students and yourself to write letters, essays and prepare assignments.
 Google Presentations
Similar to a powerpoint presentation, Google presentation allows you to change themes, layout, transitions, insert video, and pictures.
 Google Spreadsheets
Google’s answer to an excel software, Google Spreadsheets lets you create data charts
and tables using formulas, and by sorting rows and columns.
 Google Forms
Google Forms allows you to create online questionnaires, tests and surveys. They can be combined with spreadsheets to automatically populate the spreadsheet with responses and even return scores to participants.
 Google Drawing
Much like Microsoft Visio and Smart Ideas software, Google Drawing is a program which will create mind maps, and diagrams as well as insert images and text boxes
Google Documents
Once you have chosen to create a Google Document you will be brought to this screen.
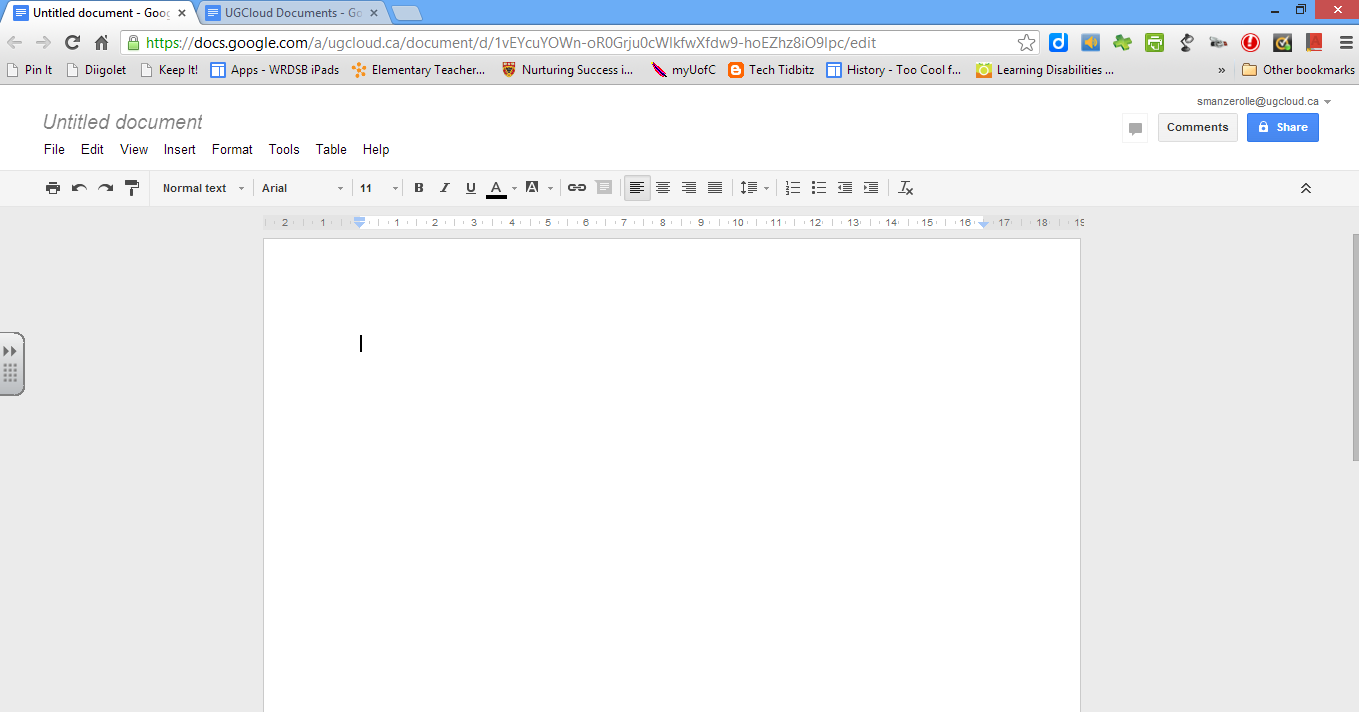
To change the name of the document click on the ‘Untitled Document’ in the upper left hand corner and enter your chosen document name then click ‘ok’.
Click anywhere in the white area and begin typing to create the letter, newsletter, etc.
To change the font, simply highlight the text with a click and drag (or control and A to select all) then choose the desired font from the drop down menu next to ‘normal text’. This is also how you can change the size of the font. To underline, italicize, change the colour or boldface the text simply select the text as above and click on one of the following icons or use the drop down menu under ‘Format’.

 To create numeric or dotted bullet points click on one of the following images:
or choose the type you wish from the ‘Format’ menu under ‘line styles’.
Creating a table in the document is easy to do by clicking on ‘Table’ then ‘Insert Table’. You can hover over the correct number of rows and columns you would like in your table then click on the lower right hand corner of the table you would like created. It will be inserted into the document where the cursor is being shown. Additionally you can add or delete columns or rows by using the drop down menu under ‘Table’.
Students can email the document they have created to you (Select 'File' then 'Email as an Attachment') or simply ‘Share’ it with you for assessment or feedback. By clicking on the Share box in the upper right hand corner they will be able to determine who can view, edit, comment or have ownership of the document. Here they can also choose how private they would like the document to be (only persons with the link can access, private to only persons with the invitation or open to all of the world wide web).

They may begin typing names (first or last) into the ‘add people’ bar to find email addresses to share the document with friends and teachers.
Finally, when a document has been shared with you by a student, all of the previous edits have been automatically saved on the Google Drive. By clicking on the ‘Last edit saved on...’ link at the end of the tool bar you will open another window on the right hand side that will show all previous editions with the changes made in an alternate colour. If more than one person has been collaborating on the project, each of their contributions will be displayed in separate colours.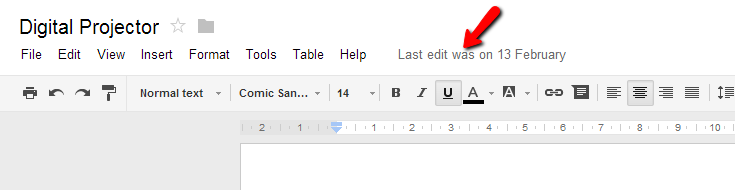
I hope that this helps clarify the process of writing documents on the UGCloud and if there are any questions or if you would like additional clarification about the procedure, please feel free to contact me via email or on the blog.
Cheers,
Stacey
No comments:
Post a Comment